This is a dedicated step by step rooting guide for the Samsung Galaxy Tab 12.2 with model number SM-T900. We’ll using the CF-Root procedure by ChainfireXDA to gain root access, which is one of the best and safe way available for this variant. Let’s move on to get started. It is highly recommended that you first read the guidelines and requirements section before rooting your device.

Guidelines and Requirements:
- Samsung Galaxy Tab Pro 12.2 SM-T900
- CF-Root package: CF-Auto-Root-v2wifi-v2wifixx-smt900.zip
- Odin3 tool is required but that is included in the cf-auto-root package.
- Install Samsung Kies or USB drivers on your PC.
- Go to Settings > Developers Options and enable USB debugging.
- Charge your tablet battery to at least 50%.
- Last but not the least, Carefully read and follow the instructions to safely and successfully root your tablet.
How to Root Galaxy Tab Pro 12.2 SM-T900 running on Android 4.4.2 KitKat
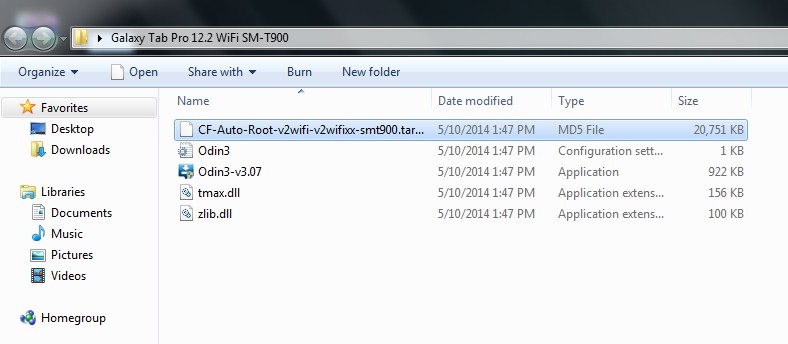
Step 1: Download and unzip the CF-Auto-Root files on your desktop:
Step 2: Turn off your tablet and reboot it into Download Mode, press and hold the Volume Down+Home+Power button together until you see a warning on your screen. Further hit the Volume Up button to enter Download Mode.
Step 3: Run the Odin3 v3.07.exe to start the rooting process for Galaxy Tab Pro 12.2 WiFi.
Step 4: Next, connect Galaxy Tab Pro 12.2 to PC via the USB cable, wait for Odin detect your device. The ID: COM port will turn blue with the COM port number and you should also notice the Added!! in the message section.
Step 5: Click the PDA button and select the CF-Auto-Root-v2wifi-v2wifixx-smt900.tar.md5 file:
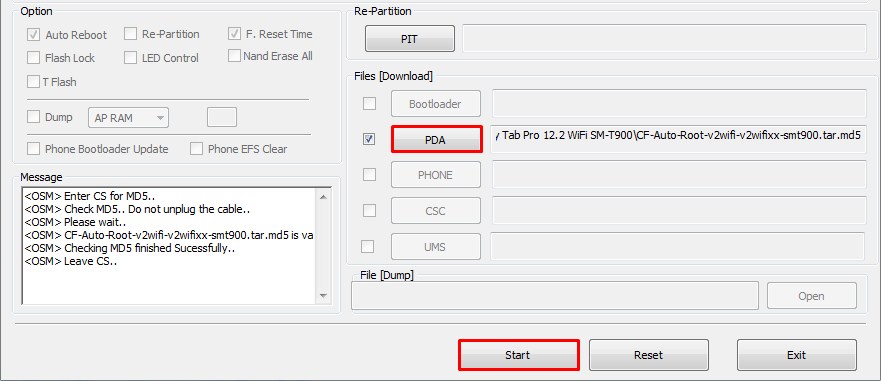
Step 6: Hit the START button to flash the rooted kernel on the Galaxy Tab Pro 12.2.
Step 7: Finally when cf-root is successfully flushed, Odin will give you PASS!! message on Odin3 screen and your phone will automatically reboots. You can now disconnect your phone from PC and wait till your device reboots normally.
Step 8: Check that SuperSU has been installed on your device. You can further verify root access by installing ‘Root Checker‘ from Google Play Store to verify root access.
What if you’re experiencing any errors or issues with SuperSU after rooting. Follow the instructions to solve the issue:
- Download and install the latest version of SuperSU from Google Play Store.
- Open SuperSU app (update the binary if prompted) and allow it to disable KNOX.
- Reboot your device.
- That’s it!! It should be working fine.
Finally do not forget to leave feedback once you rooted your tablet, feel free to ask any queries you may have or if you do need further assistance and support, we’ll try our best to help you out. For more like this rooting tutorials, keep visiting.

I followed the directions and downloaded the required files to root my Galaxy Tab Pro 12.2 SM-T900. I had stock firmware T900UEUAND4 and the process failed and soft bricked the device. I was able to only get into download mode. Luckily I was able to find and download the correct stock firmware file and flashed it using Odin V3.9. The device seems to be working okay again. Not sure why it failed when attempting to root. If you try this you may want to have the stock firmware to flash in case the root does not work.
I am not sure what actually you’ve done. But CF-Root method always work, you might have done something wrong!! Why don’t you give it a try and let us know, I am sure this time it should work..
The T900UEUAND4 update was added last week by Samsung and is their latest one for the SM-T900. This is the 2nd case of bricking I’ve read today. I have the same update and am hesitant to use Auto-root and land in the same brickland. Can anybody verify they’ve gotten past this update?
Also got bricked. Also had T900UEUAND4update.
Use odin to manually flash the firmware…
Follow the step-by-step guide over here:
http://androidcentral.us/2014/02/how-to-flash-firmware-using-odin-samsung-devices/
And when you’re done, let me know. I will tell you how to root your phone.
Thanks for your quick reply Imran. The step-by-step guide worked without issue. My tablet is back to its original self.
Glad it worked for you.
If you have the T900UEUAND4 update installed, you can do what I did to successfully install CF-Auto-Root from Chainfire. There are 2 actually steps and you won’t even erase your current setup. Download the 2 files P900XXUANB3-RecoveryImg.tar and CF-Auto-Root-v2wifi-v2wifixx-smt900.tar.md5. Using odin 3.07 you flash the first file from the recovery mode. After completion, it will reboot and your firmware version will remain the same. Then go back to recovery mode and run the 2nd file using the same odin. When it’s done (less than a minute), it will reboot and you’re done. No wiping required. I performed this surgery on Monday night, and it went smoothly. Good luck.
tried this. got stuck in caching. screen went blank and went static. scared me big time
OK I got I it! If you get stuck on caching you need to wipe your cache in recovery then flash chainfire in Odin. Just did it with this update.
Same here. Ever get your updated device rooted??
Yes. First updated, then screwed then tablet, then used the bootloader mentioned above (Note version) and now it is rooted and running.
wait, so I applied the bootloader above, are you saying that’s all you had to do to become rooted after the failed auto-root? Or did you re-apply the auto-root?
I teied installing SuperSU and it said there were no SU binaries. So, I assumed I was not rooted.
Oh I’m sorry, what I wrote was just to unbrick my device.
When I’m at home, I can see what I used to root the device, so please wait till I’m coming back. within a few hours 😉
I have used the file as mentioned at step 5. Only thing is, you have to install the bootloader that I earlier mentioned.
Then yo can follow the steps as described.
OK, I did apply that bootloader, so I assume I just re-flash the auto-root and I should be good to go?
yes, that’s all 🙂
Got it. Thanks!
glad to help you 🙂
yes. That’s all
Will this trip Knox?
Yep!
thank you for this set of post !!!! I have been pulling my hair out for about 6-7 hours trying to fix the brick that happened with me following the above rooting/installing TWRP. First I flashed TWRP, and it passed; then I rooted fine with CF-root. However, I couldn’t get it into recovery with the hard buttons; and flashify said I still had stock root. Everything was working fine rootchecker said I had root…… but I was worried about not having recovery. Finally, I realized flashify could “reboot recovery,” which I did — and that’s when everything got stuck.
No recovery. Totally stuck on opening “Galaxy Tab…” screen. I couldn’t even get the tablet turned off; it just stayed on this screen, would blank when I held the power down for a while, but then immediately come back to that screen. I couldn’t get into recovery even with the hard buttons !
I COULD, however, get it into download mode, so I figured I could odin back to stock. Unfortunately, I couldn’t find the stock ROM files ANYWHERE !! I extracted a few, tried a few, upgraded from odin 3.07 ro 3.09, nothing worked. Downloads took forever, — then didn’t work. All the sites promising stock firmwares, even for other countries, just turned out to be dead-end, sign up and pay-your-money sites which pissed me off even further.
Finally I hit upon this post. Viola ! It worked fine (took more than a few seconds — 2+ minutes actually, but maybe it was my anxiety). Flashed this bootloader (in the BL tab of Odin 3.9) and the tablet’s back to working again. I still had root. Flashify still says I have stock recovery, but I haven’t had the guts to try it out again yet…..
Thanks again, thanks for the space to rant !!
HElP ME! it faied in cache and now says firmware upgrade encountere an issue please select recovery mode & try again. i beg u to help me
READ !!!!!. It’s written below.
finally worked for me after I re read the thread several times. in one of the below posts it says ‘download this bootloader’. just use my experience and do it NOW. then you can follow the above instructions and get root for the 12.2 . just do it and dont worry about it. it works. all I want now is to install a custom recovery on my tab pro and I will be set. instructions?
I have only gotten as far as ” Go to Settings – Developer Options…..” Can’t find that anywhere. Go to Settings, in what???
Tap several times on build number in about device
Go to Settings > Developers Options and enable USB debugging.
This not necessary.
I did the rooting of my Tab Pro 12.2 and it went so smooth I sent the author/developer a good contribution.
But now I have random reboots, totally unpredictable.
Any ideas? Bo
Reboot it into stock recovery and try clearing the device cache that might fix the issue.
I tried that and it didn’t help. Would installation of TWRP help? Thank, Bo
Having the same problem here – did you manage to solve it?
I have tried everything to root my Samsung Galaxy Tab Pro 12.2 and I always have issue with it getting stuck on cache.img
Overall, I found these instructions to be very helpful. But I’d like to point out that you must turn on install apps from “unknown sources” in the tablet’s Security Settings for this procedure to work. Rooting noobs might not be aware of this. I just rooted Samsung Galaxy Tab Pro 12.2 with firmware T900UEUANI1 on 10/25/14. Thank you to everyone who contributed to the instructions and comments here.
i the same firmware and rooted many Samsung devices but for some reason it keeps on failing, any ideas ?
You just saved my ass. THANK YOU THANK YOU THANK YOU for posting this!
it fails all the time
Read my post above….
for some reason this site prevents me from posting the link to fix your problem!!! I have posted 3 comments to the problems above and none of them has appeared! say something about this site!!!!!!!!!!!!!!!!!!
I rooted this way it worked but the next day i recived in supersu no binary installed and i have no root now. What should i do?
I’m not really new to rooting. I’ve rooted previous tablets and phones, but I did make a simple mistake that may have cost me a brand new Samsung Galaxy Pro 12.2. I followed the instructions by downloading everything and installing onto my Windows PC. Before I began the rooting process, I needed to step away for a minute to answer a phone. When I got back, I started Odin, shutdown, and placed the tablet into download load mode and hooked up the USB 3.0 cable. I then started the root procedure and got a progress bar in Odin and the tablet. Things started off ok, but after about 5 minutes, I got a “Failed”. The the tablet screen had the “always on” message that I needed to use Kies to recover. I tried the entire procedure again with the same failed results. I looked at various ways online to keep the new tablet from being bricked, but couldn’t find a usable solution. I even tried doing it all over again on a rebooted computer, and then on a different computer. Long story short, it dawned on me the I hadn’t placed the tablet into developer mode yet. That’s the only thing that I can think of that failed the rooting process for me, and if I hadn’t needed to answer the phone, I might not have missed that step along the way. If this was indeed the cause, then let that be a warning to always retrace your steps again if you are distracted by something (measure twice, cut once). Now, other than sending it back to Samsung, does anyone have any possible suggestions that I might be able to do in an attempt to recover and use the tablet again, or is it officially bricked? I did remove the rear cover and unplugged the battery, so that the screen wouldn’t finally drain it.
Did you ever find a way to fix your problem? I had usb debugging enabled but still received this error when the install of this failed.
No problems. After all done, open SuperSU and it will ask to disable Knox, select yes. It will spin and spin, so exit the app. Then reboot. Then open SuperSU and it will ask again and select ok. It will take about 2 seconds for success. Done!
I wish someone would redo/reorganize this article based upon the latest stock firmware on this tablet if you were to buy one today, and also incorporate/organize all the fragmented instructions scattered throughout this thread in a logical sequence. The way it is now it’s so disorganized and confusing I would not dare to attempt it.
Does anybody know how to unlock the bootloader for the Sm-t900
the most important thing is to wipe the cache ! it worked after many many trials !
Sorry, this totally doesn’t work, it fails to complete, then leaves your tablet in an ‘update failed’ mode. Kies and Smart Switch are of zero help, since neither will recognize the tablet, in that state.
I got lucky and found a way to restore stock recovery using Odin. You’d be far better off just skipping this whole process. At best, you’ll end up back at original recovery and firmware, at worst, you’ll brick the tablet, for which Samsung has no answer.
Just skip this one, use the tablet as is, and avoid all the hassles. They don’t work as instructed. Root just isn’t possible for the SM-T900. You *can* install TWRP, which won’t allow you to flash or fix permissions, anyway.
Hi. I followed the guide but the tablet keeps on rebooting. What can I do ? Please help me
1. Power off your phone.
2. Reboot into recovery mode. Power+Home+Volume Up.
3. Clear cache, wipe data and factory reset your phone.
This should fix your phone.