The Xperia series has been really lucky for the Sony as the Galaxy S line is really doing well for Samsung. Xperia models has captured a small margin of the Android Smartphones market, they are amazing with respect to specifications and really worth trying. Sony Xperia L was previously released, in March, 2013 with Android OS v4.1 but then it was officially updated to Android 4.2.2 Jelly Bean. I don’t much more about the phone but definitely you may own it and might be well aware of its specs, so lets stop this conversation here and come to our main business!! You definitely will be looking for a perfect, easy and safe way to get root access on your Xperia L and that is what today I am going to guide you. Well First of all, this tutorial is a 1 click root method, which is off course not a rocket science and you can easily do it, but probably you’ll need the proper guidelines and tools in order to root it safely.
In our tutorial, we’ll be using the DooMLoRD Easy Rooting Toolkit, DooMLorRD is a recognized contributor and developer at XDA. Using this tool you’ll be able to do the following:
– Root ur device using the pref_event exploit
– install Busybox
– install SU files
Guidelines:-
1. Warning!! Rooting will void your phone warranty.
2. This Tutorial is applicable on both Locked and Unlocked Bootloader devices.
3. Enable USB Debugging on your phone from Settings then scroll down to Developers Options and there you should find the option to enable it. Also enable Unknown sources from Security tab, which must be in the settings section.
4. Make sure you’ve already installed the USB Drivers for your phone on PC.
5. When proceed for the root process, just check that you’ve got enough battery on your phone.
6. Use this Tool at your own risk.
Instructions – How to Easily Get Root Access on Sony Xperia L Using the DooMLoRD Rooting Toolkit
1. First download the Root toolkit from Here and extract it on your desktop.
2. Next, Connect your phone to PC via the USB Cable and make sure that PC has recognized your phone otherwise check that you correctly installed the drivers.
3. In the extracted folders you’ll find three files:
– runme_linux.sh (For Linux Users)
– runme_mac.sh (For Mac Users)
– runme_win.bat (For Windows Users)
4. Depending on your operating system run the correct file by double clicking it.
5. As I am on Windows platform, you should see a command window like this:
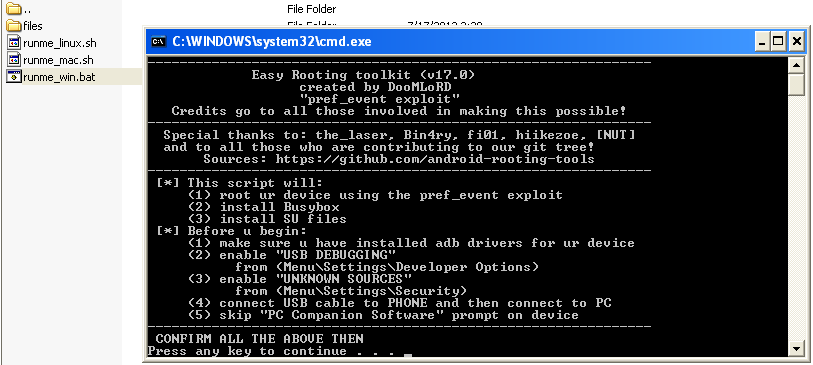
6. First of all read the guidelines (As I have already stated above) and then Press any to continue.
7. When it gets completed, you’ll be notified.
8. Now just navigate to App section on your phone and check for the SuperSU App, which must be installed, you can also go to Google Play Store and download and install the Root Checker App, which will verify root access on your phone.
That’s it folks, Hopefully that’s work for you. So what next? Well, you can look for Custom Recovery (ClockworkMod or TWRP) which will let you further flash Custom ROMs. Do let us know in the comment section, if you need further support or confused at any step. For More Android Stuff and Tutorials, do not forget to visit us back.

adb server not out of date it says… not working for me on experia L