Recently Samsung released the Official Android 4.2.2 Jelly Bean (XXUDMH6) for the international LTE variant of Galaxy S4 I9505, with some minor improvements to the UI and bug fixes. If you’re one of those who updated their firmware, then probably you would have lost your Root, now follow this step by step guide, How to Root Galaxy S4 I9505 running Android 4.2.2 Jelly Bean (XXUDMH6).
As usual there’re certain guidelines and prerequisites, you need to follow and do in order to successfully root Galaxy S4 I9505.
Preparing Your Device
- At first note that, this guide is only for Galaxy S4 LTE I9505, Android 4.2.2 XXUDMH6. Do not try this on another variant of Galaxy S4, it may brick your device.
- This guide is specifically for Windows users.
- Rooting your LTE Galaxy S4 will void its warranty. However you can reclaim warranty by installing the Official Stock Firmware.
- It is recommended that you Backup your data.
- Make sure you’ve installed Samsung USB Drivers on your PC. If not then download it from our download section, given below.
- Enable USB Debugging on your Galaxy S4, by going to Settings -> Applications -> Developers Options. If you already have not enabled developers options, then go to Settings->then More tab->About Device-> and tap the Build Number for about 7 times and that’s it.
- You need to have at least, 60% charged battery on your Galaxy S4.
- Last but not the least, one wrong step taken can brick your device, therefore, it is recommended that do not skip any step otherwise, we will not be responsible, if anything goes wrong with your device.
Download:
- Click Here to Download Samsung USB Drivers for your PC. Note that if you have already installed the Drivers of Samsung Kies, then there is no need to download this file.
- Click Here to Download Odin3 v3. 07
- Click Here to Download the CF-Auto Root zip package for LTE Galaxy S4.
How to Root Galaxy S4 LTE I9505 running Android 4.2.2 Jelly Bean (XXUDMH6)
1. First of all extract the Odin3 zip package and run the Odin application.
2. Now you need to Reboot your Galaxy S4 into Download Mode. Here is how to do it;
- Switch-off your GS4.
- Now Press and Hold the ‘Volume Down+Home+Power’ buttons at the same time, till you see the warning message on your screen.
- After that just hit the Volume up button and you’re in download mode.
3. While in download mode, connect your GS4 to PC using the data cable. At this stage make sure, Odin recognizes your device. You’ll also see the Added in the message section of Odin and the ID:COM will turn Yellow or Blue.
4. If for some reason, Odin did not recognize your GS4, then try changing the USB port or Reinstall the USB Drivers for Galaxy S4.
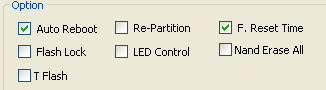
5. Make sure to check the Auto Reboot, and F. Reset Time, are checked.
6. Finally you’re ready to Root Galaxy S4 LTE, I9505. Just click on the PDA button and select the CF-Auto Root package file you recently extracted and then hit the START Button.
7. After then, Odin3, will flash the root package on your GS4, after gets complete, you’ll be notified in the message section as well as you’ll see green PASS! Message and you’re Galaxy S4 will automatically Reboot.
8. That’s it folks, Once your device boots normally, make sure that SuperSU App is installed on your device. You can also install ‘Root Checker’ App from Google Play Store to Verify Root Access on your Galaxy S4 LTE I9505.
I think it was an easy Root Tutorial, and hopefully you’ve learned how to Root Galaxy S4. Let us know and share your feelings and experience with us in the comment section, how everything went up for you. Do not forget to share it with your friends, if they have got the same device. Stay tuned to Android Central for more tips and tricks, Root Tutorials, Updates and much more.
